ePub 2: The Road More Or Less Followed
Note: Since this article was originally published, the Google ePub package known as Sigil has been left without support, which is too bad, because it was a solid, useful tool and the one I had come to depend upon. Calibre, however, is still around and continues to be a mainstay for ePublishers. This article has been rewritten (January 20, 2014) to reflect a simpler workflow and the use of Calibre.
In the previous article we looked at what ePub is and how you can use Smashwords as your single-step, almost free approach to ePublishing.
But I took a slightly more complex route. When I first wrote this article I said that you need to know some HTML markup language, but in fact there is an easier workflow that does require such knowledge. Internally, ePub documents are formatted in HTML, and it’s nice to know that and nice to be able to tune your html for greatest efficiency. But it’s no longer necessary to know this stuff to get your book out. My goal was to get my book onto as many platforms as possible, price it at one or two dollars per digital copy so my target audience of young readers could afford it, produce some sort of paper version and share as little as possible of my royalty with anyone aside from my family, friends and Ian, down at The White Horse who lets me run a tab.
Like most authors, you probably wrote your book in Microsoft Word, and you probably wrote it in a template that made for easy editing and perhaps submission to agents and publishers. If so, you have two conversion tasks in front of you: First, converting to ePub format for digital publishing, and second, converting to a printable template for output to Createspace, or some other print-on-demand service.
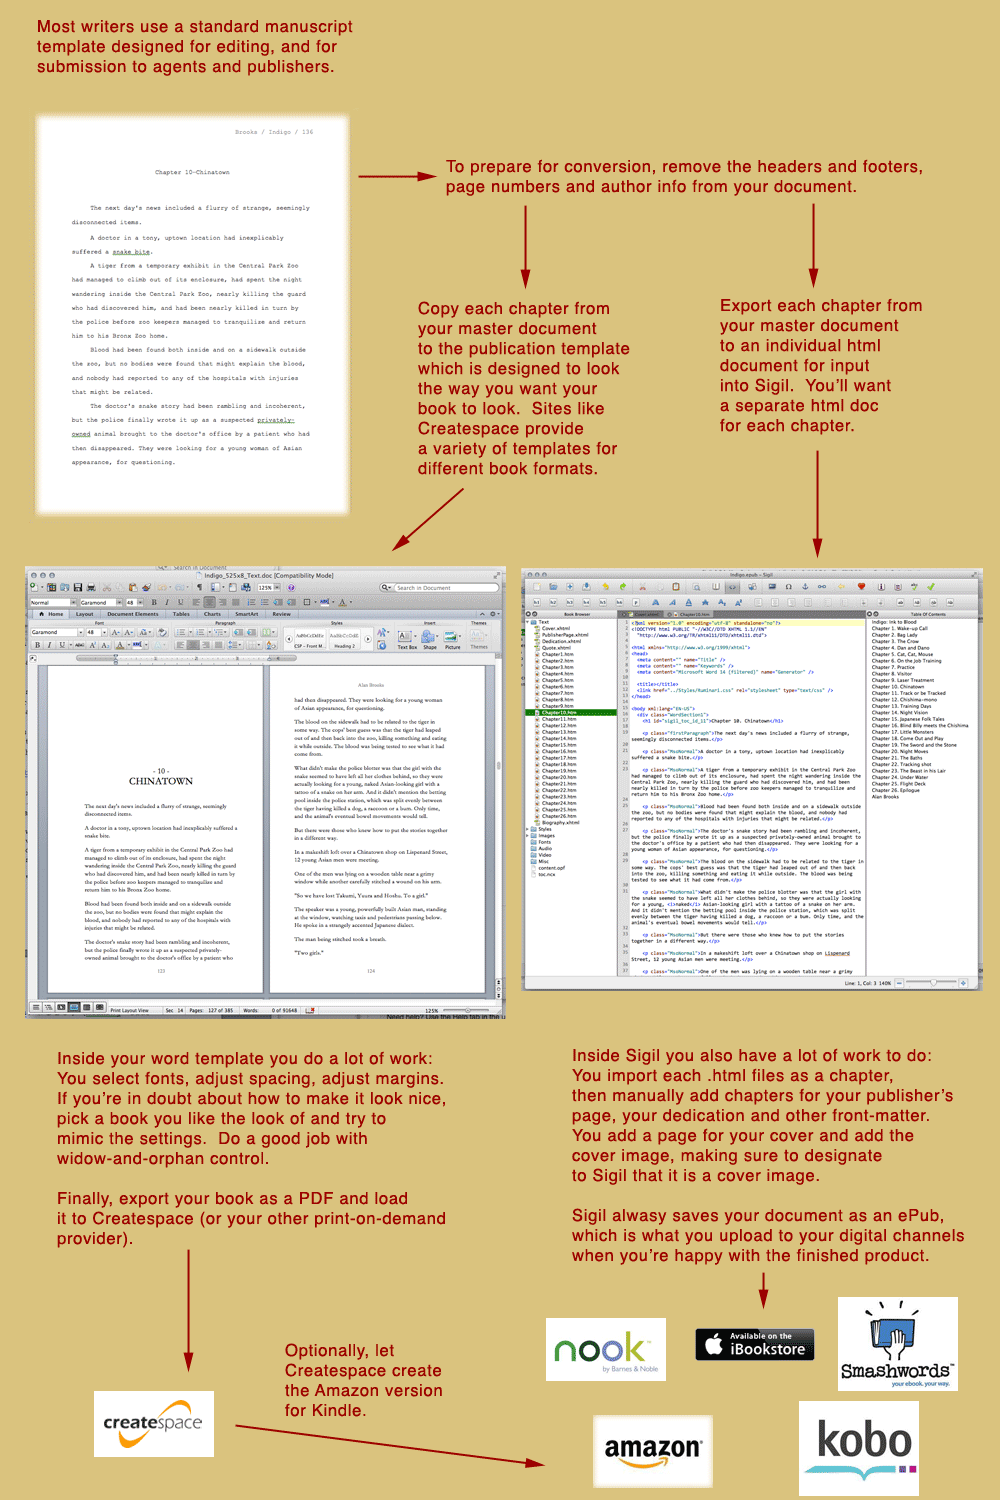
Getting your manuscript off the laptop and into stores. The attached graphic is my older, more complex workflow. Using Calibre greatly simplifies things.
To follow my route here are the tools you need:
- Microsoft Word
- Calibre, for adding “metadata” tags to your nearly-ready e-book
- an ePub validation checker, like the excellent one provided by Google
- If you have an iPhone or iPad, download Apple’s Book Proofer application. This is an excellent way to validate your formatting by uploading your ePub onto your own iPad or iPhone so you can leaf through and see how it looks.
- A Word template that conforms to your POD provider’s requirements Generally, it’s good to get this template from your POD service, so if you’re having Createspace do your print-on-demand book, download and use a Createspace template.
- Apple’s utility for loading your book to the iTunes Store. It’s called iTunes Producer
One aside on the ‘Tools’ front: Apple supports a variation on the ePub format called iBook. Books published in iBook format are best built in a very nice tool provided for free by Apple, called iBooks Author. Apple is in full-court-press mode trying to become the go-to platform for design-heavy digital publications like recipe books, how-to books and, especially, text books. For straight-on fiction, non-fiction, biography or any other book that’s not graphics-heavy or full of fancy charts and learning-aids, iBooks Author is simply overkill. It might seem like a cool idea to produce a “special edition” of your book for the iPad, a version that has a more sophisticated layout or embedded media, but unless you have a very good reason to do this and are dedicated to doubling or tripling your work, don’t do it.
Okay, so you’ve got your tools downloaded and installed.
Do some Business.
- Get your cover art done and your cover designed. Pay for this if your best friend or spouse isn’t a book designer. If you go with a font-based cover it’s worth it to have a designer put it together for you. If you are having art done, a good dimension to work from in the American market is 6×9 inches. You artist can work larger, keeping to that aspect ratio, but if they create something very large you might have to pay someone to scan it for you.
- Write three perfect synopses of your work. You’ll use these in various places — at the site where you register your ISBNs, on each of the sales channel sites, on the book jacket and in any marketing material you produce. Write one synopsis as a single sentence or maybe two short sentences. Write the second one as a single, short paragraph, and then write a longer one that might work as a description on the back of a book or on Amazon. If you’ve never done this, check out the best books in your genre to see how others have done it.
- Figure out which genre your book fits into. There are a couple different standards. Start with BISAC, decide on your top two genres and subgenres and note the codes for them.
- Go to the Library of Congress website and register your copyright. Don’t believe any of this crap about mailing a copy of your manuscript to yourself in an easily broken-into and fake-sealed envelope. That doesn’t mean anything. Just go register. It’s easy and you can do it all online. Protect yourself. Be professional. Be ready for success.
- It takes a while to get approved as a publisher/content-provider, so right now, go off to Createspace, Apple, Amazon, Kobo, Barnes & Noble and Smashwords and set up an account at each. You’ll need to provide tax information, contact, payment and other legal info. You might also find that you can’t or don’t want to conform to some of the legal or business requirements — Apple’s requirements are the most restrictive so do them first. Some vendors pay into a bank account or into a merchant credit card account. Others will only pay into a PayPal account. Have a refrigerator full of cold beverages ready as you do this. If you’re uncomfortable spreading your tax id and banking information all over the web — a legitimate concern — then consider just doing Createspace for print and Smashwords for digital.
- Order a block of ISBNs. You do this in your home country, and Americans do it at Bowker, aka “My Identifiers”. It’s $100 for 1 ISBN and $250 for 10, so go get 10 of them. You’re going to burn 2 in this exercise, one for the print version and one for the ePub version. As part of registering your ISBNs you’ll need to upload your cover art (See, I told you to have it ready). Assign one of your new ISBNs to your digital edition and one to a print edition. You can’t finalize the print edition registration until you know how many pages you’ll have in print form, which means you’ll have to come back here after converting your book to the print template. You’ll also need to declare a publication date, which you can leave blank if you’re not sure how long the remaining steps will take. But you’ll have to come back here and fill that in as well.
Editing
- Create a copy of your book that includes all the internal material, even the pages you wouldn’t send to an agent: the title page, chapter headings, page numbers, author’s bio. You can do this in a Createspace template if you like, which positions you to use the same version for print publication as for ePub.
- Copy-edit this version like crazy. Hire a copy-editor. Search for obvious double-words (“and and”, “a a”). Check every use of their, there, they’re, your, you’re, yore, its and it’s.
- Copy-edit it again. If writing is re-writing, then editing is re-editing. Convert your double-dashes to em-dashes if you haven’t already. Either eliminate any smart-quotes, or make sure they’re consistent. You shouldn’t have any fancy formatting in this version. Indents at the start of paragraphs should be part of your paragraph style, not manual “tab” characters and absolutely not a string of spaces, which will not work in a real, ready-for-publication template.
- Export from your word processor as HTML (which might be called HTML or HTM… means the same thing). Depending on your word processor this might be called “Save as a Web Page”. This is the step that MS Word has always done a bad job on. Word outputs way more information than you need, so you can and should experiment with the output options to get the smallest file you can achieve. Do yourself a favor and clean up your document’s style sheet before you create the html version. MS Word puts out enormous amounts of style information that you don’t need, so it can help with passing quality checks at Smashwords, Amazon and Apple if you have only the essential styles in your stylesheet.
Formatting your ePub
- Open Calibre and import the html files from the previous step. Add your cover image to the cover and make sure you flag it as the cover image in the metadata. Add your author name, ISBN and any other metadata Calibre requires. Save your book in ePub format. You now have an eBook. If you’d like more information on Calibre’s features, they have an excellent video tutorial.
- Back in your word processor, create a short version of the book — maybe the first chapter or two — to provide as a giveaway or teaser when selling your book. Some sites request that you do this, others insist on it. I copy my ePub from myTitle.doc to myTitleExcerpt.doc and delete everything except the chapter or chapters I want to provide as teasers, leaving in the cover and front-matter chapters, so the freebie feels sort of book-like, and then go through the same process as the previous step to create a mini version of your book.
- A quick word about cover art: Each site has its own requirements as far as size and quality. Keep your largest, best quality version intact and be prepared to downgrade it as required. As of this writing, Amazon requires that your ePub *not* contain a cover image as that’s added later in the Kindle publication process. Most of the other distribution channels want the cover embedded on the cover page.
- Check how your book looks in a few eReaders. Use Stanza to get a sense of how a bare-bones reader will render your book. Use Apple’s Book Proofer to see how it looks on your iPhone or iPad.
- Once you’re happy with the look and feel of your book, upload the ePub to each of your digital stores. The only platform that is a little different is (surprise) Apple. If you’re publishing to the iTunes Store yourself, and not through Smashwords, you publish via the Apple application called iTunes Distributor. With iTunes Distributor you build a “distribution” which is stored on your local machine, and then you send that distribution up to Apple. The other distribution platforms all use web interfaces. Keep in mind that you have an option with Amazon to let Createspace publish your digital version as a variation on the print-on-demand version. I published my ePub directly to Amazon because I knew I was going to be fiddling with my Createspace version for a while, the ePub version was ready and there seemed no reason to wait.
So, you’ve published to Apple with their custom app and to Kobo, Smashwords, Nook and Amazon via their web interfaces. Shazaam! You’re done with the ePub process. Some platforms make your book available immediately. Others have a delay while they verify that your book conforms to their standards. Either way, you’re done with this process.
Formatting and publishing for Print-on-Demand
- Using the account at your POD service — let’s just say Createspace — get a template the conforms to the size of book you’d like to publish. There are no hard-and-fast rules for this, but I like to pull out some book and see how they feel in my hand. I liked the feel of a nice, hefty Game of Thrones edition I had here and the closest Createspace template I could find to that was 5.25 inches by 8 inches. I downloaded the template and copied my chapters from my cleaned up manuscript into this template. My 415 page manuscript rendered, after some re-formatting, into a 385 page document.
Consider the size of your book carefully. It might come to 280 pages at 6×9, but 320 pages at 5.25×8. The printing cost of your book drives how you can price it, so don’t choose a format that makes your book feel bigger just because it has more pages. Also, you don’t want to print it at 8.5×11 just to keep costs down, because at that size you’ll only have 100 pages and the format will make it feel more like a comic book than a novel.
- Be very careful when removing pages in a publication template. You want to preserve the recto and verso layout of pages. By convention, recto pages are odd and verso pages are even. The publisher’s information page, with copyright and edition information, goes on a verso. The dedication goes on a recto. Stick to conventions for a professional look. Do indent the first line of each paragraph. This gives the reader’s eye a sort of ‘target’ to hit when returning to the left side of the page from the right. It’s less tiring to read a well formatted book.
- Do your widow-and-orphan control. Widows are opening lines at the bottom of a page that become separated from the paragraph they belong in. Orphans are single words or single lines which trail over onto a following page. They look funny and introduce an odd cadence for the reader. You can adjust widows and orphans via subtle changes in letter spacing, by adjusting words in a paragraph, or very small changes to leading. These changes should be so small the reader cannot detect them. It’s tough to get it right, but the result will be a more professional looking book.
- Finally. Your book looks exactly how you want to to look. You export as a PDF (or ‘Print to…’ a PDF) and upload the PDF to Createspace. You will upload the book cover separately. Read the cover instructions carefully. You need to pay attention to ‘bleed’ settings as well as binding sizes. You cannot fully design your cover until you know what page size template you’ll use, and the number of pages your book will have, as the page count determines the width of the book’s spine. Once the cover and content PDFs are uploaded, and you’ve provided another of your carefully crafted synopses, order a print proof. Don’t go nuts ordering tons of proofs as they are delivered to you with ‘Proof’ stamped on the back page, so they’re not a version you’ll want to sell. Approve the proof, wait a few days, and your book will appear for sale on Amazon. Congrats!
- Get marketing (we’ll go into that in the next article in this series).
Previous article in the series
Next article in the series: Pricing and Marketing your eBook (coming soon).